Showing posts with label recipe. Show all posts

Friday, April 3, 2020

Chili - With A Few Modifications For Social Distancing/Quarantine

We’ve had colder weather this week than we did last week.  Fortunately, it hasn’t dropped down to freezing, so all of the blooming flowers and bushes are doing just fine.  It has, however, been cold enough to warrant making some soups and general comfort foods.

Chili is one of Nick’s absolute favorite foods, so it seemed like a good time to make a batch of chili. This recipe is based mostly on my usual recipe, which you can find here.  On a side note, I posted the original recipe over six years ago.  It’s hard to believe I’ve been blogging that long.  Some of you have been visiting that entire time, or very close to it.  Thank you to all of you who visit and comment.  I enjoy your online company.

Anyway, back to the recipe. 

The biggest modification I made to this recipe was with the meat.  I’m not sure about where you are, but meat seems to be in very short supply here.  We’re in the western part of the state, and my sister is in kind of the middle of the state, and she said it’s the same there.  We have a chest freezer, and I tend to shop sales and stock up anyway, so we were actually in pretty good shape going into this, without panic buying.  However, it does seem prudent to try and stretch things a bit more now.  It seems like every time a new restriction goes into place there’s another round of panic buying, and I just don’t think we’ve reached the height of our social distancing yet.  So, again, I think it’s prudent to go ahead and get a little creative now instead of being forced to get super creative later.

We had three leftover grilled hamburgers in the freezer, so I decided to use them instead of a package of ground beef.


I defrosted them and chopped them up into very small pieces, and used them in place of the usual ground beef.


I browned the onion (half a yellow onion and half a red onion that were in the fridge leftover from other meals) and pepper (from the freezer) in a small amount of avocado oil.  We happen to have a large bottle of avocado oil at the moment, so that’s why I chose it.  I really think whatever your usual oil of choice is will be perfectly fine. 


I added everything to the Crock Pot, and just stirred in the taco seasoning, chili powder, and cumin since they weren’t cooked with the meat.  I left it on low, and it was ready for dinner.


We ate it over macaroni noodles and topped it with shredded cheese and sour cream.


It was delicious!   This turned out to be a very good recipe modification.  The grilled meat really added a depth of flavor to the chili.  Nick said it was the best chili he has ever had.  I think I may try to keep some grilled hamburgers in the freezer for chili in the future. 

I highly recommend giving this a try if you happen to have any grilled hamburgers on hand.

So what about you?  Do you enjoy chili?  Are you modifying any recipes due to lack of availability of certain items?

Tuesday, November 27, 2018

Black Bean Soup

As much as I love Thanksgiving, and all of the food that comes with it, it’s nice to change things up a little the week after.  After all of the rich food and dessert last week, something simple is just right this week. 

This also seems to be the time of year when things just keep getting busier, so easy meals are very welcome.  A Crock Pot meal that’s ready and waiting when I get home is perfect. 

I love this recipe for so many reasons.  First of all, it’s delicious.  It’s also very simple to put together in the morning before work, especially if you do the chopping the night before.  The beans don’t have to soak, so that’s one less step.  I think it’s reasonably healthy since it’s vegetarian, and doesn’t have packaged ingredients. 

Black Bean Soup:

16 oz. (1 pound) dried black beans
2 onions, chopped
2 bell peppers, chopped
½ cup firmly packed fresh cilantro leaves
1 Tbsp salt
1 ½ tsp chili powder
1 ½ tsp cumin
½ tsp pepper
4 cloves garlic, pressed
10 cups water

Rinse beans, and place all ingredients in a large slow cooker.  Cover and cook on Low 9 - 10 hours. 

The soup is great on it’s own, but it’s also really good topped with diced onion, avocado, or salsa.  And it pairs well with cornbread. 

Tuesday, November 13, 2018

Cinnamon Sugar Butter

Flavored butters really add an extra something to a meal.  They’re super easy to make, as long as you remember to take the butter out in plenty of time to soften.  They have a big impact, and are a great way to add a little something special and extra.

Some people say that you should use unsalted butter if you’re making a sweet flavored butter.  I disagree.  I tend to view unsalted butter as the anti-butter.  It rarely makes its way into our house.  Most of the time I use salted butter, even if a recipe calls for unsalted butter.  I do not enjoy unsalted butter, and I don’t like having it sitting around in the refrigerator.  Salt helps to enhance flavor, and I really don’t think the butter tastes salty if you use salted butter for this.

Cinnamon Sugar Butter
4 oz. butter, softened
1 packed Tbsp light brown sugar
½ tsp cinnamon

Combine all ingredients in a small bowl, and mix well.

Enjoy! 


Wednesday, October 24, 2018

Answering Questions

I’ve noticed when it comes to blogging that about half of the bloggers I usually visit seem to respond to each comment on their blog, and about half don’t seem to respond to any, at least in the comments section.  I’m never really sure which one is best.  I don’t know if people actually check back, so I very rarely respond to anything in the comments section. 

I also don’t write many (any?) posts that are going to inspire much debate, or raise very many questions.  There’s only so much discussion possible when it comes to recipes or cat pictures.  That being said, there is an occasional question in the comments section, so I thought I might start periodically doing a post with responses to those. 

I’ve skimmed over the last several posts, and these are the ones I noticed:

On Throw Back Thursday - The Baby Howard Edition, Liz asked if Howard still tries getting into places that are too small for him. 

Not really.  Howard is “portly” as the very nice nurse at the emergency vet once described him, and has been for a while.  I think he’s used to not fitting very many places.  He’s also twelve now, so doesn’t do nearly as much climbing around as he used to. He does like to squish himself into the smallest pet beds possible, but I think that’s probably just for the warm, cozy feeling.  Howard is super cuddly, and is happiest when he’s cuddled up to someone else.

When I posted my Cheap Steak Fajitas recipe, and lamented my inability to make beef stew, Bijoux made the comment that she thought I needed a Crock Pot until realizing that the recipe was a Crock Pot recipe.  

All of my failed attempts at beef stew have been in the Crock Pot.  I usually have great luck with Crock Pot recipes, so I’m not sure what the problem is when it comes to beef stew.  

Betty asked if I’d like a recipe.  

I’d love one!  If it claims to be simple or foolproof, I can definitely put that to the test.  

When I posted my Tzatziki sauce recipe, Cat asked for possible substitutions for dill.  

I’ve had it without dill, and it’s good.  That’s actually how we were taught to make it in the cooking class I took.  Honestly, I prefer it with dill, but it’s still really good without it.  If you’re looking for a substitution, though, I would probably try oregano or mint, since those are typically already found in the types of food you’re likely to be having with Tzatziki sauce.  

And I think that’s it for posts that had any kind of questions.  Like I said, I don’t seem to post very much that raises questions or leads to much debate.  

So, how do you handle questions and comments on your blog?  Do you respond to every comment, or just questions?  Or do you do something else entirely? 

Tuesday, October 23, 2018

Tzatziki Sauce

I love tzatziki sauce.  It’s one of my favorite things about eating any kind of Greek or Mediterranean food.  The food is already amazing, then you top it with an incredible sauce, and it just gets better.

We’ve taken a few cooking classes at a local Mediterranean restaurant, and one of the things we learned how to make was tzatziki sauce.  I was surprised at how simple it is to make.  I thought anything this delicious had to be at least a little bit complicated, but it’s surprisingly simple to make.

It’s also very easy to customize to your particular tastes, likes, and dislikes, so don’t be afraid to experiment.  This version is the result of my experimenting with a version of the recipe we were taught in class, and a version we tried at another restaurant out of town.

Tzatziki Sauce:

1 cup plain Greek yogurt
Scant 1/4 cup finely chopped cucumber, seeded (or use seedless, it’s much easier)
1 garlic clove, pressed
½ tsp lemon juice
1/4 tsp dried dill
Salt to taste, usually just a sprinkle or two

Combine all of the ingredients in a bowl, mix well, and serve chilled.


You can use plain regular yogurt, if you prefer, or if that’s what you have on hand.  The sauce turns out just fine.  It’s a little thinner, and I assume somewhat less authentic, but still delicious.  You can also leave the salt out if you prefer.  I don’t recommend that.  I love salt, and I’m convinced there’s very little food that isn’t improved by the addition of salt, but that’s just my opinion.

The sauce doesn’t keep very long at all.  You’ll need to use it within about 24 - 36 hours of making it.  That’s really not a problem, though, with a sauce this good.  It’s great on pita chips, gyros, grilled or baked Greek seasoned chicken, Greek omelettes, basically anything that pairs well with a creamy, garlicky sauce.

Tuesday, October 9, 2018

The Easiest Apple Crisp Ever

Even though it doesn’t really feel like it, it’s officially fall.  I’m very happy for the warmer weather to hold on for as long as possible, but I do love the flavors of fall.  Enjoying fall flavors and warm weather suits me just fine.

This apple crisp is incredibly easy to make, and it’s perfect for fall, whether you’re savoring the last bit of warm weather, or have already moved on to fall weather and activities. 

Easy Apple Crisp:

2 cans apple pie filling (any brand will do, typically Aldi has apple pie filling this time of year, and it’s great, as well as inexpensive)
1 box yellow cake mix
2 sticks butter, butter melted
½ cup sugar


Spread pie filling in the bottom of a 9x13 baking dish. 

Melt butter in a glass mixing bowl in the microwave.  Combine cake mix and sugar with the melted butter.  The consistency will be a little bit like cookie dough. 

Drop and spread over the apples.  Don’t worry about it if there are a few gaps; it will spread out as it bakes.

Bake at 350 for 50 - 60 minutes, until it’s a nice golden brown.

Enjoy!

I think it’s best served warm, with a little vanilla bean ice cream. 

Wednesday, September 12, 2018

Cheap Steak Fajitas

I tried to be clever with the name and play on the word cheapskate, but I’m not entirely sure it works.  These fajitas, however, definitely work.  They’re delicious!  They’re also ridiculously easy to make.

I’ll just go ahead and be honest with you.  The idea for these came from failure.  Lots and lots of failure.  I cannot make beef stew.  I’m not sure what my issue is, but it just doesn’t work for me.  I’ve tried various recipes, and various combinations of recipes.  The best result I’ve had is mostly edible, which is not the description you really want for your meal. 

I have finally decided to give up on making beef stew.  We’ve suffered enough.  Nick was elated when I informed him that I was officially giving up on making beef stew.  He was kind enough to say that I make plenty of other things extremely well, and we’d be fine without beef stew, but his initial reaction was definitely relief.  I can’t blame him. 

Unfortunately, I had purchased a gigantic package of stew beef at Sam’s Club before I decided that making delicious (or even good) beef stew is not something I am capable of.  I froze it in one pound packages, and decided I’d come up with other ways to use it.  This is one of my alternatives, and I’m happy to say that it’s as good as my beef stew is bad. 

Here’s what you need:

1 pound stew beef, cut into bite sized pieces
1 -2 bell peppers, chopped
1 -2 onions, chopped
1 package (1.2 oz) fajita seasoning mix
1.5 tsp lime juice
1/4 cup water
2 Tbsp tequila

The tequila isn’t in the picture because I didn’t think about adding it until I started thinking about having a margarita with my fajitas, and had already taken the picture.  I think you can probably leave it out if you don’t happen to have tequila on hand, but I do think it probably does help to tenderize the meat a little bit.  It’s so good with the tequila, too, so I highly recommend using it.

Combine all of the ingredients in a small slow cooker, and cook on Low for 5 -7 hours, until meat is cooked through, and the vegetables are tender.

It’s going to look a little dry when you mix everything, but resist the temptation to add more liquid. 


There’s a fair amount of sauce with these, so they’re really good served with rice to soak up some of the sauce. 


Serve with any combination of rice, beans, tortillas, lettuce, sour cream, guacamole, etc.

Enjoy!

Tuesday, July 31, 2018

Kumato Tomato Quiche

I first saw Kumato tomatoes in Aldi a couple of years ago, and decided to give them a try since I had never heard of them.  They’re now my favorite tomato.  They’re not the easiest tomato to find.  I can’t usually find them anywhere other than Aldi, and Aldi doesn’t always have them.  I make sure I buy them whenever they’re available.

You can read a little more about them here if you’re not familiar, and prefer to learn about them before you try them. 


Kumato tomatoes are delicious!  I love them in salads, on tuna sandwiches, on bagels with garlic and herb cream cheese, and in this quiche.  Really, I haven’t found a way I don’t like them.  Don’t worry, if you don’t have Kumato tomatoes you can substitute Roma tomatoes in this recipe. 

Kumato Tomato Quiche

1 prepared pie crust

2 garlic cloves, pressed

1 onion, thinly sliced

1 tsp olive oil

9 eggs

½ cup shredded Parmesan cheese

3/4 cup cottage cheese

1/4 cup half and half

1 tsp basil, plus a little more for sprinkling

½ tsp oregano, plus a little more for sprinkling

Salt & pepper to taste

2 - 3 Kumato tomatoes, thinly sliced, OR Roma tomatoes, thinly sliced

Heat the olive oil in a small frying pan, over medium heat, and saute the onion, with the garlic, and a little salt, just until the onions begin to brown.  Remove from heat, and allow to cool.

In a large mixing bowl, beat the eggs, and stir in the cheeses, half & half, basil, oregano, and salt and pepper to taste.

Spread the pie crust into a pie dish, and lightly sprinkle with some basil and oregano.


Once the onions have cooled completely, stir them into the egg mixture.  If you add hot onions to the egg mixture you will end up with a really gross partially scrambled egg concoction, so make sure they’re cool before you add them.

Pour the egg/onion mixture into the pie crust.

Top with the tomato slices.

Bake in a 350 degree oven for about 50 - 60 minutes, until set through.  Test the middle with a small knife or toothpick to make sure it comes out clean.

Enjoy!


Have you tried Kumato tomatoes?  What is your favorite kind of tomato?


Tuesday, July 24, 2018

We Have Blackberries!

We were able to pick blackberries from our own backyard over the weekend.  We planted the bush last year, and were fairly certain that Duke destroyed it, but to our delight it came back this year.  And now we have blackberries.

We had more berries than this, but we both ate while we picked, so this is all that made it for the picture.  We have lots more berries that aren’t ripe yet, so it looks like we’ll be enjoying blackberries for a while.

I’m ridiculously proud of these.  It’s our first time growing berries, so I’m pretty excited.  It still amazes me when we plant something and it grows and produces food.   There’s just something so satisfying about walking out into your own backyard to pick what you’ve planted and grown yourself.  And I love blackberries. 

We plan to add another blackberry bush next year, and maybe try a raspberry bush, too.  You can’t have too many berries, right? 

Are you growing any berries?  What’s your favorite berry?  If you have an abundance of blackberries, and are looking for a way to use them, here’s a recipe for Blackberry & Mint Green Tea. 

Sunday, May 27, 2018

Peanut Butter Rice Crispy Treats

These peanut butter rice crispy treats are so good!  I’ve been meaning to share the recipe here for a while now, but they’re so good they never last very long, so it took some time to get pictures of them.  Everyone loves them.  I’ve added them to the list of treats I take to people at Christmas, and they’ve been really popular. 

They’re incredibly simple to make, which is good, because they’re the kind of thing you’ll want to make over and over again.  They’re not baked, which makes them a nice addition to my list of Christmas treats since oven space is at a premium then.  It’s also nice to have a dessert that doesn’t require the oven during the hot weather, so these are a great treat pretty much all year. 

Peanut Butter Rice Crispy Treats:

6 cups rice crispy cereal (It’s perfectly fine to use a store brand; I usually use the Aldi brand.)

1 stick of butter

1 10 oz. bag mini marshmallows

½ cup creamy peanut butter

½ cup crunchy peanut butter

Combine butter, marshmallows, creamy peanut butter, and crunchy peanut butter in a medium sauce pan over medium-low heat.


Stir often.  Keep stirring often, until everything is melted.


Pour rice crispy cereal into a large mixing bowl.  Pour peanut butter mixture over cereal.  Mix well, making sure all of the cereal is thoroughly coated with the peanut butter mixture.  You’ll need to work fairly quickly so it doesn’t start to set before all of the cereal is coated.

Once everything is well mixed, place the mixture in a 9 x 13 dish, spreading it around evenly.


At this point, you can technically dig in if you just can’t stand to wait.  However, it won’t slice nicely unless you wait for a couple of hours.  If you’re eating it at home, and you don’t care how it looks, go for it.  If it needs to be sliced, and you want it to look nice, you’ll need to wait a couple of hours for it to set completely before you slice it. 

Enjoy!

Tuesday, May 1, 2018

Mini Naan Pizzas


We found these mini garlic naan at Sam’s Club last week.  We seem to always find something not on our list that we just have to try whenever we shop there.  This time it worked out really well.

We’ve been making more of an effort to eat at home rather than going out to eat, especially when it’s just because we’re in a hurry, tired, or haven’t planned something.  We’re trying to treat going out to eat as more of an event, and less of a necessary thing.  That means sometimes we need something really fast and easy at home.  Because sometimes it’s just one of those days; it’s late, we’re tired, the kitchen is already a mess, we have a million other things to do, etc.  Fast and easy wins the day.

These mini naan pizzas are fast, easy, and delicious.  They’re about the fastest option I’ve found for pizza since the naan is already cooked and you’re really only melting cheese.  They’re pretty similar to the Summer Vegetable Pizza I’ve shared before, but don’t involve the refrigerated crust.  We have also made our own crust using the bread machine, but that process takes about an hour, so isn’t the best option when we need something in a hurry. 

Using the mini naan is great not only because it’s fast, but it’s also super easy to customize them to individual tastes.  I hate mushrooms, but Nick loves them.  I love onions, but Nick prefers not having them on his pizza.  I made two mini pizzas for each of us, and it was perfect for dinner. 

I just used the ingredients we had on hand, and didn’t measure anything, so I don’t have an exact recipe.  I think it would be pretty hard to mess these up, though, and the possibilities are almost endless, depending on the vegetables you enjoy and have on hand.

For these I used a lone squash that was lingering from last week’s produce box, a tomato, some kale from the produce box, a handful of mushrooms, part of a red onion that was left over from another meal, shredded mozzarella cheese, shredded cheddar cheese, olive oil, two garlic cloves, Italian seasoning, salt, and pepper.

Combine the garlic cloves, pressed, in about a tablespoon of olive oil (I just estimated the amount, and it was perfect for four mini pizzas) with a sprinkle of Italian seasoning, and brush over the naan. 

Sprinkle a little cheese over that.

Top with thinly sliced vegetables.  If you’re using kale I recommend putting it on first to keep it from getting too crispy on top.  Sprinkle the vegetables with a little salt, pepper, and Italian seasoning.

Sprinkle some more cheese on top.

Bake at 350 for about 15 minutes, basically until your cheese is nice and melted and your vegetables are starting to get tender.

Enjoy, while congratulating yourself on having pizza that was faster, cheaper, and healthier than delivery would have been. 

Thursday, January 18, 2018

Thrifty Thursday - The Chicken Tikka Masala Substitution Edition

On Saturday I decided to make Chicken Tikka Masala for dinner, and I made a substitution that I’m calling a win on multiple fronts.

We’re doing a Pantry Challenge this month, so we’re making a real effort to use what we have on hand, stay out of the grocery stores as much as possible, and spend a lot less money on groceries this month.  I decided on Chicken Tikka Masala for dinner because we had chicken breasts in the freezer, cream in the fridge that was fast approaching its use by date, and some fresh ginger that really needed to be used.  It also sounded perfect for dinner on a cold and windy night.

It was so cold here on Saturday!  We had been in the mid fifties on Friday.  It had rained all day, but it was at least warmer than it had been.  On Saturday we were back down to the low twenties, and had crazy high winds.  Going out to the grocery store, or anywhere for that matter, wasn’t much temptation.  I had absolutely no interest in changing out of my nice warm pajamas, or leaving the house.

The only problem was that the recipe I was using called for a serrano chili, which we didn’t have.  The recipe also called for canned tomatoes, which we have an abundance of.  Harris Teeter put their brand of canned tomatoes on sale for 37 cents a while back.  That’s cheaper than Aldi, and the cheapest I’ve ever seen canned tomatoes.  Most of our favorite recipes seem to be tomato based, so I thought it was a good idea to stock up.  As usual when there’s a great sale on groceries, I went overboard in my effort to stock up.  We have a lot of canned tomatoes!  And that’s just one of the many, many reasons why we’re doing a Pantry Challenge this month.

 Since I really, really didn’t want to go out, I decided to substitute canned tomatoes with chilies for the serrano chili and canned tomatoes.  I’m very happy to report that it worked out perfectly, and that the Chicken Tikka Masala was delicious.

I was thrilled:

1.  Not to have to go out in the cold.  That was honestly the best part of my successful substitution.

2.  That we stayed on track with the Pantry Challenge.  I most likely would have ended up buying more than a single serrano chili if I had gone to get one. 

3.  That I have a new substitution that I know works.  It’s much faster and easier to open a can of tomatoes with chilies than it is to deal with coring and chopping a chili.  That’s good to know for busy days when I need to get dinner ready in a hurry, and want to make things as easy as possible.

So what about you?  Have you made any recipe substitutions to use what you have on hand lately?   Is the cold weather enough to make you do whatever you can to stay home? 

Tuesday, December 5, 2017

Cherry Crunch

This is a very simple recipe that’s great for Christmas time when you’re doing lots of cooking and baking.  Actually, it’s pretty nice to have any time during the year, but I always make a lot of it in December.  Sometimes you just need something relatively easy.  As a nice little bonus, pretty much all of the ingredients seem to be on sale this time of year, so it’s pretty budget friendly.

Now, don’t get me wrong, this isn’t just a dessert to make just because you want something easy, or don’t want to buy a lot of expensive ingredients.  It’s delicious!  Everyone who has ever had it raves about it, and most people ask for the recipe.  I took one to my chiropractor’s office today, and they were very happy with it. 

Cherry Crunch:

2 cans cherry pie filling
1 box yellow cake mix
½ cup sugar
1 cup chopped pecans
1 cup (2 sticks) butter, melted

Spread pie filling in the bottom of a 9x13 pan. 

Melt butter in a large glass bowl (about 30 - 60 seconds, depending on your microwave).  Combine cake mix, sugar, pecans, and melted butter.  The consistency will be a little like cookie dough.  Drop and spread over the cherries.  It’s okay if there are a few gaps, it will spread out a little when you bake it. 

Bake at 350 for 50 - 60 minutes, until golden brown. 

Enjoy! 

I think it’s best served warm.  Nick thinks it’s best at room temperature.  We both agree that a little vanilla ice cream on top makes it out of this world good.  And of course we agree that this time of year it’s also great served with Christmas music.  On that note, I’ll leave you with Barenaked Ladies and Sara McLachlan’s God Rest Ye Merry Gentlemen. 


Monday, August 14, 2017

Lime Basil Water

Basil is the one herb that consistently thrives in our yard.  It doesn’t matter where we plant it, or how much we neglect it.  We always end up with lots of basil.  I’m not complaining.  I love basil, and I love finding new ways to use it.  My latest way of using basil is incredibly simple, and incredibly delicious.

We all know we need to drink plenty of water, especially during the warmer weather, but sometimes it’s hard.  Plain water can be a little boring.  Adding lime and basil brightens it up a little bit, but the flavors are still fairly subtle.  

Lime Basil Water:
1 gallon of water
½ cup basil leaves, rinsed
1 Tbsp lime juice.

Combine all three ingredients in a pitcher, stir, and refrigerate.

Enjoy!

Recipe Notes:
I like to use this style pitcher because the ice guard keeps the basil leaves in the pitcher, and out of my glass.  The basil flavor gets stronger over time, so if you don’t drink all of the water within about 24 hours, spoon the basil leaves out, otherwise the flavor becomes a little too strong.  I use plain tap water.  I know it’s not the case everywhere, but the water here tastes good and doesn’t have any strange odors.

Monday, July 31, 2017

Blueberry & Almond Yogurt Parfait

The local grocery stores have had great sales on fresh blueberries for the past few weeks.  Really, really good sales on deliciously perfect blueberries.  Eating them fresh and by the handful is always an option, but sometimes it’s nice to come up with different ways to use them.

This yogurt parfait is incredibly simple, easy to make ahead of time for a quick weekday breakfast, and it’s delicious.

Blueberry & Almond Yogurt Parfait:


1 cup vanilla yogurt
½ cup washed blueberries, divided
1 Tbsp sliced almonds, toasted*

Spread 1/4 cup of the blueberries in the bottom of a bowl.  Layer the yogurt on top.  Top with remaining 1/4 cup blueberries.  Sprinkle with almonds.  Enjoy!

If you’re making this the night before, just don’t add the almonds so they don’t get soggy.  Cover and refrigerate after the final layer of blueberries.

*To toast the almonds:
Preheat a small non-stick skillet over medium heat.  Add almonds, stirring constantly, for 2 - 4 minutes, just until they barely begin to darken.  It takes about two seconds for the almonds to go from not quite toasted to burnt to a crisp.  You don’t want to step, or look, away from them.

Tuesday, April 4, 2017

Chicken & Black Bean Tacos

Tacos are one of the go to foods in our house.  We both love them, they’re relatively inexpensive, we can each customize them to our liking (I’m all about the toppings, while Nick is more of a purist), and they’re kind of a no-brainer to make most of the time.

Don’t get me wrong, I like trying new recipes, and I definitely enjoy challenging myself in the kitchen.  Sometimes, though, between work schedules that are sometimes opposite, pets who seem to go to the vet a lot, and all of the random things that come up in life, I just want something easy.  Or better yet, something that’s easy, and pretty much ready to eat when we get home.  These chicken and black bean tacos fit the bill.

You’ll need two separate slow cookers for this recipe.  It may seem a bit odd to own two, but I promise it’s worth it.  You just can’t beat the convenience of having dinner cooked when you come home.  If you’re busy, or deal with conflicting schedules, it can make the difference between a home cooked meal and fast food.  We bought our second small Crock Pot about seven years ago, and it has been well worth the cabinet space.

Any color bell pepper is great in this.  I like to use one color in the beans, and a different color in the chicken.

The chicken and black beans freeze and re-heat well, so depending on how many people you’re cooking for, you can easily freeze part of this and have a night of not having to cook later on. They’re also great as nachos.  


Chicken & Black Bean Tacos:

Black Beans:
1 bag (16 oz.) black beans, rinsed
1 onion, very finely diced
1 bell pepper, very finely diced
1 ½ tsp salt
¼ tsp pepper
1/3 to ½ cup fresh cilantro leaves (optional)
1 garlic clove, minced or pressed
1 tsp chili powder
1 tsp cumin
4 ½ cups water

Combine all ingredients in slow cooker; stir; cover, and cook on Low for 6 – 7 hours.


Chicken:
2 - 3 boneless, skinless chicken breasts
1 package taco seasoning
1/4 to 1/3 cup fresh cilantro leaves (optional)
½ tsp chili powder
½ tsp cumin
¼ tsp pepper
1 bell pepper, chopped
1 onion, chopped
1 ½ cups water

Place chicken breasts in slow cooker; place onion and pepper over chicken. Add taco seasoning and spices; add water, and stir together. Cover and cook on Low for 5 – 6 hours. Shred with fork and stir together in sauce.

Spoon chicken and beans into taco shells; top as desired with lettuce, cheese, onion, avocado, etc.

Enjoy!

Monday, April 3, 2017

Banana Pound Cake

I first made this banana pound cake with my paternal grandmother.  I don’t remember the first time we made it, but we made it together for years.  I always assumed it was her recipe.  I made it a few years ago when my aunt and uncle came for dinner, and learned from my aunt that it’s actually her grandmother’s, my great grandmother’s (she of the sweet tea fame, so you know it’s good) recipe.  Apparently she was quite the baker.  I don’t remember any baked goods from her.  Her arthritis was pretty bad by the time I was a small child, so she didn’t do much cooking or baking.  If this cake is anything to go by, I really missed out!

This cake is incredibly delicious!  It has become a favorite among the security officers at work, and is one of the most requested cakes when I bake for people at Christmas.  My dad’s “subtle” way of asking for it is to inform me of how many sticks of butter they have when I visit them, or to count the sticks of butter we have when he visits us.

It’s not usually an issue because everyone loves this cake so much, but it doesn’t keep very well.  It only lasts for two or three days.  I live in the south, with a lot of humidity, so you may be able to store it for a day or two more if you live in a dryer climate. It’s a really moist cake, so it tends to get moldy really fast, especially if you slice it and store it in a plastic container.  Like I said, it usually gets eaten long before it has a chance to go bad, but it does limit the ability to make it ahead of time for an event.

Banana Pound Cake:

3 sticks (1.5 cups) butter (Not margarine, real butter!)
Additional butter for greasing the pan
2 cups sugar
Additional sugar for coating the pan
4 large eggs
2 cups mashed very ripe bananas (usually somewhere between 3 and 6 bananas, depending on the size)
1/4 cup & 2 Tbsp buttermilk
1 1/4 tsp vanilla extract
3 cups all purpose flour
1 1/4 tsp baking soda
1/4 tsp salt
½ cup chopped pecans

Generously butter and sugar a bundt pan. You want every little crevice well coated in butter, or the cake isn’t going to come out of the pan nicely.

Beat butter at medium speed w/ electric mixer, or in a standing mixer, 2 minutes, or until creamy.
Gradually add sugar, beating 5 - 7 minutes.

Add eggs, one at a time, beating just until yellow disappears.

Combine mashed banana, buttermilk and vanilla in a small bowl.  Combine flour, baking soda, and salt in a medium bowl. Add alternately to butter mixture; starting with flour mixture, and ending with buttermilk mixture. Mix at low speed after each addition, just until blended.

Stir in pecans.

Spoon batter into buttered and sugared bundt pan.  Bake at 325° for 1.5 hours, or until wooden pick inserted in center comes out clean.

Cool pan on wire rack for 15 minutes, remove cake from pan, and cool completely on wire wrack.

Enjoy!

Saturday, November 19, 2016

Practically Fool-Proof Turkey

With Thanksgiving almost upon us, I thought I’d share my turkey recipe.  I’ve had a few misadventures when it comes to cooking turkeys, but this recipe is practically fool-proof.  It’s also incredibly delicious!

Thanksgiving perfection! 
It’s a little different from what you might expect, but I promise it’s delicious.  It’s cooked cavity side up, which I believe is technically “upside down”.  If you can get the past the fact that it looks a little different, it’s totally worth it to cook it this way.  It makes for an incredibly moist turkey.

There’s no basting with this recipe, which I think helps to make it fool-proof.  It’s also much more convenient.  Once you get it in the oven, it’s pretty much good to go.  I like being able to concentrate on other things once the turkey is in the oven.  And not constantly opening the oven door.  

I’ve noticed that it always seems to take much longer for the turkey to cook than what the guides on the wrappers say.  The turkey in this recipe was a 16.5 pound turkey.  Per the wrapper, it should have cooked in about 4.5 hours.  It took six.  I don’t think my oven is that far off when it comes to temperature.  Since cooking time varies so much by weight, I usually add about an hour and a half to two hours on to what the wrapper says when I’m planning what time to put it in the oven.  I check on it at the end of the longest suggested time (if the wrapper says 4 - 4.5 hours, I check it as 4.5 hours), but it has always needed the extra time.

Don’t forget to give it plenty of time to thaw if you’re using a frozen turkey.  I bought a 22 pound turkey for the big day this year, so it’s going in the fridge on Sunday to begin thawing.  The last thing you want is a partially frozen turkey in the wee hours of Thanksgiving morning.

The measurements for this recipe are for a 16.5 pound turkey.  You’ll probably need some more vegetables if you’re cooking a larger turkey. Whenever I find that I’ve chopped more vegetables than I can stuff in the turkey, I just put the extras in the bottom of the roasting pan.  It just adds more flavor.  I like this combination of vegetables because I think the celery adds a lot of moisture, and the onions and carrots pack a lot of flavor.  And you can’t go wrong with butter.

The wine adds some nice flavor, and the water and wine together help keep the turkey moist.  It also makes for some amazingly delicious pan drippings.

You can use the vegetables in your dressing.  Rice is a Thanksgiving staple for us, and the vegetables are delicious in that as well.  I usually just add a few spoonfuls of the vegetables to the pot when I’m cooking the rice.  Because you’ll have a lot of pan drippings you can use them in rice (just replace part of the water with them), gravy, and dressing.  It’s all delicious!

Turkey
3 stalks celery, chopped
4 carrots, peeled and chopped
2 onions, chopped
1 stick of butter, kept cold until you’re ready to use it
1 Tbsp dried parsley, plus a little more for sprinkling
Salt & pepper to taste
2/3 cup white wine
2 cups water

Preheat oven to 325 degrees.  Remember to adjust your oven wracks first if you need to.  (It’s a lot easier when they’re cold!)

Open turkey package, and remove neck, giblets, and any plastic holding the legs together (leave the pop-up timer, though).  Place turkey, cavity side up, in a large roasting pan.  

Combine all of the vegetables in a bowl.  Chop 2/3 of the stick of butter into small cubes, and add to the vegetables.  Add 1 Tbsp parsley, and a few sprinkles of salt and pepper.  Mix well.

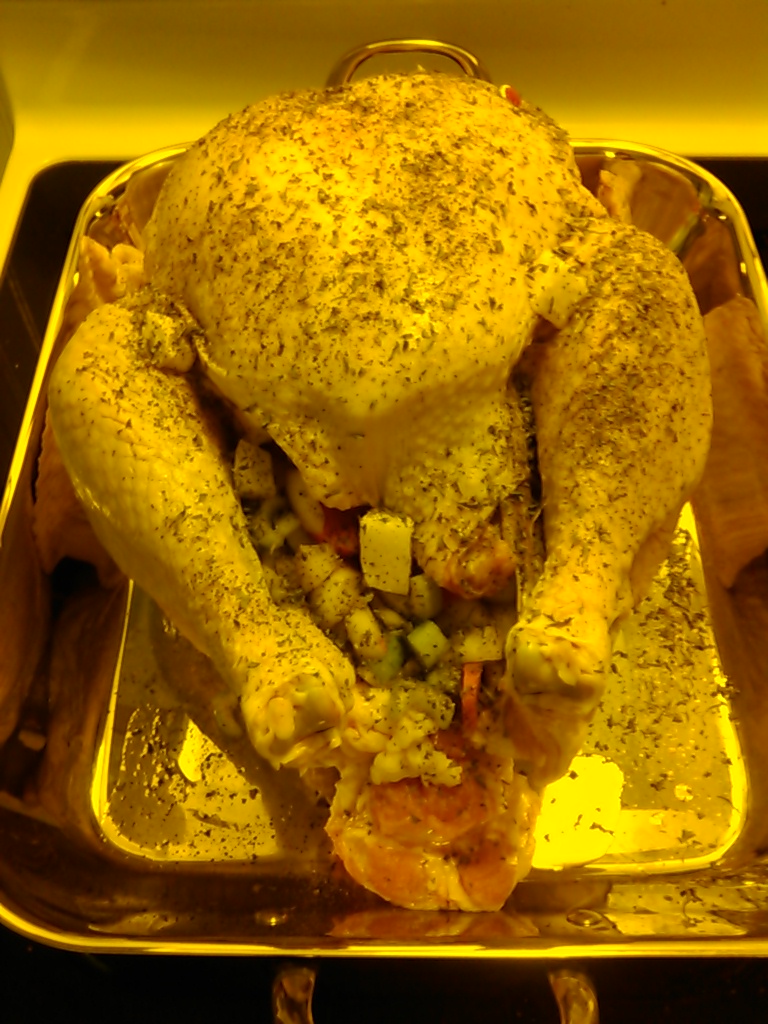
Stuff the vegetables inside the turkey.  You want to really pack it full.  It’s okay if they’re spilling out. If you have any left, just put them in the bottom of the pan.

This is how it should look just before you cover it.
Chop the remaining 1/3 stick of butter into squares and place them on the outside of the turkey.  I usually tuck them under the wings and legs.

Lightly sprinkle the turkey with salt, pepper, and parsley.
Pour the wine and water into the bottom of the pan.

Cover the pan with foil.  You want the edges of the pan to be tightly wrapped, but allow room at the top.  Kind of tent the foil, so it’s not actually touching the turkey at the top.

Bake for 4.5 - 6 hours.  Like I said, my oven always takes a lot longer than the wrapper says.  Check on it at the end of the wrapper’s recommended time.  It’s done when the pop-up timer is out and/or when you can make a cut where the leg meets the body and the juices run clear.  If in doubt, cook it a little longer.  That’s the beauty of this recipe.  The turkey isn’t going to dry out.

Try to talk someone else into carving the turkey, and enjoy!

Thursday, November 3, 2016

Sandwich Day

It’s Sandwich Day.  You can read more about it here, but it’s basically a day to celebrate sandwiches, by eating your favorite sandwich, or trying a new one.

Here are a couple of my favorite sandwiches:

A Different Kind of BLT
This one is probably my favorite sandwich right now!  Slightly different flavors, amazingly delicious.

Chicken Salad Sandwich

So what about you?  Are sandwiches on the menu today?  What’s your favorite kind of sandwich?

Tuesday, November 1, 2016

Pumpkin Pie

It’s November 1st, so I can finally talk about pumpkin pie!  I love pretty much anything pumpkin, and I especially love pumpkin pie.  I happily eat it all year long, but I know most people consider pumpkin pie to be more of a Fall or holiday dessert.

I’ve never met a pumpkin pie I didn’t like, but my maternal grandmother, Granny, made the best pumpkin pie.  I have her handwritten recipe for it, and we included the recipe in our wedding cookbook.  It’s delicious, and for me, it’s total comfort food.

Try it.  I’m pretty sure you’ll love it!

Granny’s Pumpkin Pie:

3/4 cup sugar
½ tsp salt
1 tsp ground cinnamon, plus more for sprinkling the crust and pie
½ tsp ground ginger
1/4 tsp ground cloves
2 eggs
1 can (15 oz.) pumpkin
1 can (12 oz.) evaporated milk
1 un-baked 9 inch deep dish pie shell

Preheat oven to 350 degrees.

Mix sugar, salt, 1 tsp. cinnamon, ginger, and cloves in a small bowl.

Beat eggs in a large bowl.  Stir in pumpkin.  Stir in sugar/spice mixture.  Gradually stir in evaporated milk.

Spread the pie shell in a pie dish and generously sprinkle the pie shell with cinnamon.  This isn’t the time to be stingy with the cinnamon.  Pour the pie mixture into the pie shell, and generously sprinkle the top with cinnamon.

Bake 40 - 50 minutes, or until a knife inserted in the center comes out clean.

Allow to cool/set before slicing.  (Honestly, you might want to leave the house, or at least find something really good to occupy yourself with for this part.  It smells so good, it’s fairly torturous waiting to dig in!)

Enjoy!!!

So what about you?  Are you a fan of pumpkin pie, or pumpkin things in general?