Showing posts with label turkey. Show all posts

Saturday, November 19, 2016

Practically Fool-Proof Turkey

With Thanksgiving almost upon us, I thought I’d share my turkey recipe.  I’ve had a few misadventures when it comes to cooking turkeys, but this recipe is practically fool-proof.  It’s also incredibly delicious!

Thanksgiving perfection! 
It’s a little different from what you might expect, but I promise it’s delicious.  It’s cooked cavity side up, which I believe is technically “upside down”.  If you can get the past the fact that it looks a little different, it’s totally worth it to cook it this way.  It makes for an incredibly moist turkey.

There’s no basting with this recipe, which I think helps to make it fool-proof.  It’s also much more convenient.  Once you get it in the oven, it’s pretty much good to go.  I like being able to concentrate on other things once the turkey is in the oven.  And not constantly opening the oven door.  

I’ve noticed that it always seems to take much longer for the turkey to cook than what the guides on the wrappers say.  The turkey in this recipe was a 16.5 pound turkey.  Per the wrapper, it should have cooked in about 4.5 hours.  It took six.  I don’t think my oven is that far off when it comes to temperature.  Since cooking time varies so much by weight, I usually add about an hour and a half to two hours on to what the wrapper says when I’m planning what time to put it in the oven.  I check on it at the end of the longest suggested time (if the wrapper says 4 - 4.5 hours, I check it as 4.5 hours), but it has always needed the extra time.

Don’t forget to give it plenty of time to thaw if you’re using a frozen turkey.  I bought a 22 pound turkey for the big day this year, so it’s going in the fridge on Sunday to begin thawing.  The last thing you want is a partially frozen turkey in the wee hours of Thanksgiving morning.

The measurements for this recipe are for a 16.5 pound turkey.  You’ll probably need some more vegetables if you’re cooking a larger turkey. Whenever I find that I’ve chopped more vegetables than I can stuff in the turkey, I just put the extras in the bottom of the roasting pan.  It just adds more flavor.  I like this combination of vegetables because I think the celery adds a lot of moisture, and the onions and carrots pack a lot of flavor.  And you can’t go wrong with butter.

The wine adds some nice flavor, and the water and wine together help keep the turkey moist.  It also makes for some amazingly delicious pan drippings.

You can use the vegetables in your dressing.  Rice is a Thanksgiving staple for us, and the vegetables are delicious in that as well.  I usually just add a few spoonfuls of the vegetables to the pot when I’m cooking the rice.  Because you’ll have a lot of pan drippings you can use them in rice (just replace part of the water with them), gravy, and dressing.  It’s all delicious!

Turkey
3 stalks celery, chopped
4 carrots, peeled and chopped
2 onions, chopped
1 stick of butter, kept cold until you’re ready to use it
1 Tbsp dried parsley, plus a little more for sprinkling
Salt & pepper to taste
2/3 cup white wine
2 cups water

Preheat oven to 325 degrees.  Remember to adjust your oven wracks first if you need to.  (It’s a lot easier when they’re cold!)

Open turkey package, and remove neck, giblets, and any plastic holding the legs together (leave the pop-up timer, though).  Place turkey, cavity side up, in a large roasting pan.  

Combine all of the vegetables in a bowl.  Chop 2/3 of the stick of butter into small cubes, and add to the vegetables.  Add 1 Tbsp parsley, and a few sprinkles of salt and pepper.  Mix well.

Stuff the vegetables inside the turkey.  You want to really pack it full.  It’s okay if they’re spilling out. If you have any left, just put them in the bottom of the pan.
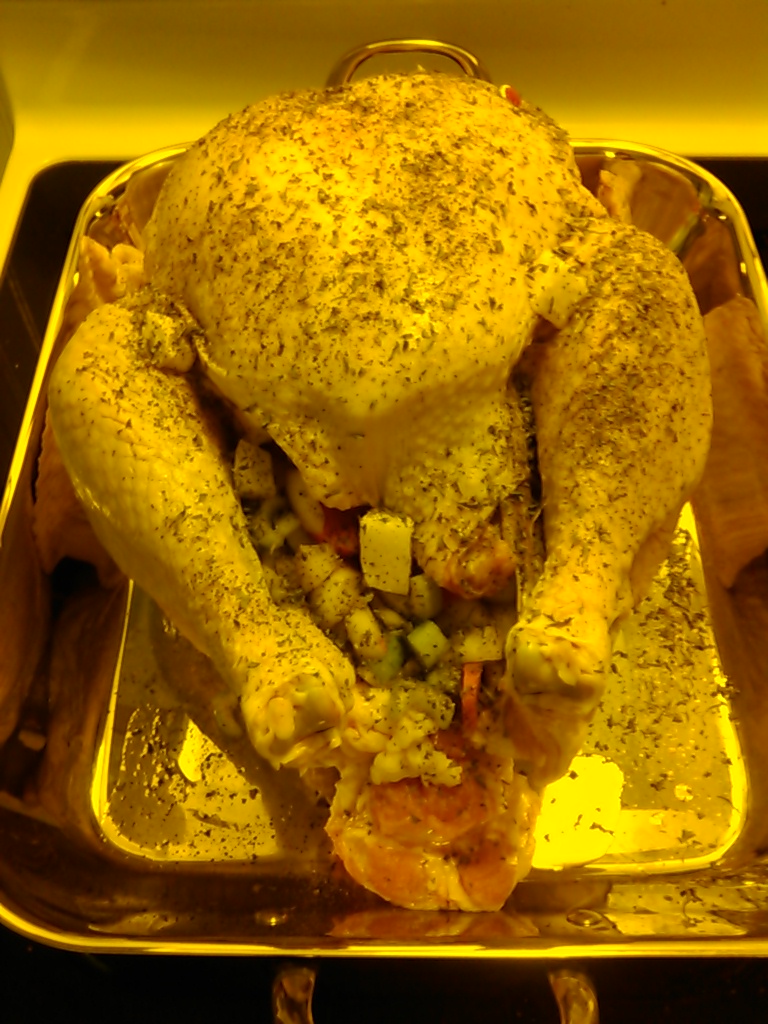
This is how it should look just before you cover it.
Chop the remaining 1/3 stick of butter into squares and place them on the outside of the turkey.  I usually tuck them under the wings and legs.

Lightly sprinkle the turkey with salt, pepper, and parsley.
Pour the wine and water into the bottom of the pan.

Cover the pan with foil.  You want the edges of the pan to be tightly wrapped, but allow room at the top.  Kind of tent the foil, so it’s not actually touching the turkey at the top.

Bake for 4.5 - 6 hours.  Like I said, my oven always takes a lot longer than the wrapper says.  Check on it at the end of the wrapper’s recommended time.  It’s done when the pop-up timer is out and/or when you can make a cut where the leg meets the body and the juices run clear.  If in doubt, cook it a little longer.  That’s the beauty of this recipe.  The turkey isn’t going to dry out.

Try to talk someone else into carving the turkey, and enjoy!

Tuesday, November 26, 2013

Let’s Talk Turkey – The Good, The Bad & The Ugly

With Thanksgiving practically upon us I thought it might be a good idea to talk about turkey. We’ve all heard the stories, and maybe even been party to, some of the turkey disasters that can befall the hapless Thanksgiving cook.  I’m sharing mine (starting with the bad and ending with the good, because I really like to end things on a positive note), and I hope you’ll share yours too. 
The Bad:  The first time I ever cooked a turkey was for a friend’s graduation party.  I was 18 years old and the oven at home was out.  My mom dispatched me and the turkey (which was her idea to serve) to another friend’s house where most of the party prep was going on.
I had no idea how to cook a turkey, but I wasn’t going to let that slow me down.  I decided that turkeys were basically just large chickens (at that point I didn’t have much experience cooking chicken either) so I would treat it that way.  My mom always bought the boneless, skinless chicken breasts, so I decided that the first order of business was to skin the turkey. Yeah.
Have you ever attempted to remove the skin from a 20 pound turkey?  You can cancel your gym membership if you’re going to make that a habit.  I enlisted my friend’s brother (who didn’t know how to turn on the oven) to help me, and we basically engaged in a tug of war match until the turkey was skinned. 
After we skinned the turkey I proceeded to wash it, using dish detergent, because I’d heard you were supposed to wash meat before cooking it.
I’ll be honest.  I didn’t try any of that turkey when it was finally cooked.  I was pretty sick of dealing with it by then.  People said it was good.  I suspect they were being polite. 
After that turkey fiasco I swore off cooking turkeys for a while.  But then my job gave everyone a turkey as our Christmas bonus is 2005. That was the year that my sister, my best friend, and I were renting a house together. 
My best friend and I decided to brave cooking the turkey. This time we knew not to skin it.
My mom has always cooked a turkey by smearing it down with a mixture of mayonnaise and mustard (about 2/3 mayonnaise and 1/3) mustard, sprinkling it with salt and pepper, and covering it with aluminum foil and pouring a little water in the bottom of the pan.  It sounds disgusting, but it’s actually pretty good.  It’s not my favorite way to prepare turkey, but it’s good.
It also sounded relatively foolproof.  Except for the fact that we had just moved in a week before and didn’t have a fully stocked kitchen.  We didn’t have mayonnaise, and we didn’t have aluminum foil, but decided that neither were terribly important. 
We were wrong.  We ended up with an extremely dry turkey that tasted more like burnt mustard (gross!) than turkey. 
Once again, I swore off cooking turkeys for a while.  I decided to learn from the pros.  I asked everyone who ever served a delicious turkey how they did it, and took copious notes.  I filled up an entire notebook with notes on how to cook a turkey. 
The Ugly:  My parents went out of town, and my husband and I came to take care of my grandparents (maternal grandmother and paternal grandmother and grandfather).  I decided it would be nice to make a big turkey dinner.  They liked it when I cooked for them, and my parents could have leftovers when they came home.
I used a combination of techniques I’d picked up from various people and the turkey was delicious.  The only problem was in carving it.  I’d never carved a turkey and neither had my husband.  None of my grandparents were up for carving it.  So hubby and I basically executed the poor turkey.  It didn’t even resemble a turkey when were finished “carving” it. 
My grandparents all giggled about it for weeks, and insisted on pictures of the carnage.  At least it tasted good!
At Thanksgiving the same year we were facing the same problem.  Hubby, my sister, my best friend, and I were all standing over the turkey (holding various carving tools) each arguing as to why we should NOT be the one to carve.  We all agreed that something didn’t look quite right already and none of wanted to be the one to execute the turkey.
Finally, another friend, Cathey, (who is much older and wiser) arrived.  She started laughing hysterically as soon as she came in the kitchen.  She said the four of us looked like we weren’t quite sure the turkey was dead and were planning to kill it if it moved.  It was also upside down (still not sure how I managed that one), which was why it looked a little off to us. Cathey carved the turkey, which was delicious.
The Good:  I have two favorite ways of cooking whole turkeys now:
The Cosmopolitan Turkey:
Stuff the turkey with a mixture of cranberries, chopped granny smith apples, and chopped onion, mixed with a about a tablespoon of butter.  Salt and pepper the turkey and pour vodka over it.  You want a little vodka pool in the bottom of the pan. Cover and bake according to the package instructions for the weight.
The Drunk Buttery Turkey:
Coat the inside of the turkey with butter and stuff with chopped onions mixed with butter, parsley, salt, and pepper.  Generously butter the outside of the turkey and sprinkle with salt, pepper, and parsley.  Pour in white wine and cognac (about 2/3 white wine and 1/3 cognac). Once again, you want a little pool of liquid in the bottom of the pan.  Cover and bake according to package instructions for the weight.
Both of these recipes are great with turkey breasts, which you can easily fit in a large slow cooker.
We’ve also learned to designate someone else as the carver.  Last year we asked a friend who was coming to come early and carve the turkey. 
So what about you?  What are your turkey disaster stories?  Or tried and true techniques?  Do tell.